By late February, Japanese news outlets began to track the sakura zensen (cherry blossom weather front) with estimated dates for when the cherry trees will enter kaika (first bloom).
Written as a pair of kanji for "open" and “flower,” the phenomenon requires a tree to have at least five or six buds fully unfurled to qualify. Long-standing custom had set April 8, the Buddha’s birthday as the height of flower-viewing in the Tokyo area, though recent and dramatic climatic changes have forced kaika to come much earlier.
Awareness of the seasons guides many aspects of Japanese culture, and nowhere is it more evident than in the kitchen and at the table. With Tokyo’s kaika imminent, sakura (cherry blossoms) take center stage as an ingredient in sweet and savory dishes alike.
Both sakura flowers and leaves are cured with salt to render them edible. The blossoms are called ōka no shiozuke (salt-cured cherry blossoms), and the leaves are called sakuraba no shiozuke (salt-cured cherry leaf). Look for them in the grocery section of department store food halls or large supermarkets that carry specialty items. Cherry leaves, and to a lesser extent the flowers, contain coumarin, a chemical compound that accounts for their distinctive sweet cherry aroma. Consumed in large quantities, coumarin can be mildly toxic to humans, though many practitioners of kampōyaku, Japan’s traditional herbal medicine, swear by coumarin’s anticoagulant properties.
Especially prized for their fluffy and deeply colored blossoms, yaezakura (flowers from trees with more than five petals) are seen as a symbol of strength — not to mention a favorite among Japanese chefs. The color of the petals is further enhanced during the salt-curing process with umezu (plum vinegar). Fully salt-encrusted blossoms are then sold in small packets or glass jars around Japan in the spring.
Native to Izu Oshima island and the Izu Peninsula, Oshima sakura (Prunus speciosa) have pale-petaled flowers. The leaves of this variety of cherry are known for their tenderness and deep aroma. Salt-cured leaves are folded in half, stacked domino-style and tied into bundles of either 10 or 45 leaves. The label on such packages will typically list citric acid and yaki myōban (alum sulfate) in addition to salt; these ingredients help preserve color and aroma. Even so, the aroma dissipates quickly after packages are opened, so it’s best to transfer any unused blossoms or leaves to containers that can be sealed tightly and refrigerated.
With the onset of kaika, lunchtime thoughts turn to outdoor picnicking, and savory sakura-flavored rice bundles. The salt-cured blossoms both perfume the rice and help delay spoilage.
Sakura rice balls
Makes four cups of cooked rice, enough to shape eight omusubi (rice balls)
Before we begin, a quick note: Japanese rice cookers are typically sold with a cup to measure raw rice. Using that cup means you can use the lines marked on the bowl of the appliance as a guideline for water. If you aren’t using a rice cooker or don’t want to use your appliance’s markings, it’s essential to use the same cup measure for the raw rice and the water to preserve relative proportions. If you don’t have a rice cooker, you can use your stovetop and a pot.
Ingredients:
- 2 cups white rice
- 400 milliliters cold water
- 30 to 40 ōka no shiozuke
- 8 sakuraba no shiozuke
- Optional: 2 tablespoons white sesame seeds, freshly toasted
Wash the rice well until the water runs clear, then drain and set aside for 10 minutes or until the rice kernels appear opaque. While waiting, get your flowers and leaves ready to use.
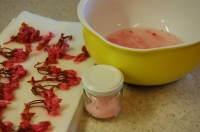
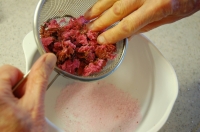
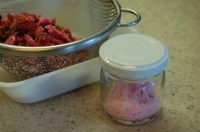
Place the ōka no shiozuke in a strainer set over a bowl. Gently shake, press and rub the blossoms against the sides of the strainer to remove as much excess salt as possible. This salt can be enjoyed as a finishing seasoning with tempura or other fried foods (it’s terrific on thick-sliced fried potatoes and also karaage fried chicken). Typically, 30 to 40 ōka no shiozuke blossoms yield about two teaspoons of cherry-aromatic salt. Store this excess salt in a glass jar with a tight-fitting lid to preserve as much fragrance as possible — the salt will keep indefinitely.
Despite shaking and rubbing, a fair amount of salt will remain clinging to the blossoms. Briefly dip the flowers in water, remove immediately and lay them out on paper towels. Set aside any visually appealing whole flowers for garnishing — you’ll need at least one to top each omusubi.
Blot excess moisture from the remaining flowers, saving the salty cherry water from dipping the blossoms. This water will be used to moisten hands and keep rice from sticking when shaping the bundles.
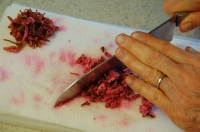
Finely mince the blotted flowers after trimming away their stubby stems. Set the minced flowers aside to toss into the cooked rice. Whatever residual salt remains clinging to the minced blossoms will be ample to season the cooked rice. This rice can be served in bowls, but for our picnic we will shape it into triangular bundles and call them sakura omusubi.
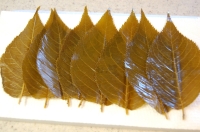
Next, turn your attention to the sakuraba no shiozuke. You will be using one leaf to wrap each omusubi. Rinse the leaves briefly in cold water and blot dry on paper towels. Although the cured leaves are edible, they are intensely flavored, and most people remove them before eating the omusubi.
By stovetop:
Use a straight-sided pot with a tight-fitting lid. Place the washed and drained rice in the pot. Add the cold water and let the rice sit for five minutes to allow the kernels to absorb some of the water. Cook the rice over high heat until the liquid begins to bubble vigorously (about seven or eight minutes). Lower the heat to maintain a gentle boil and continue to cook until all the liquid has been absorbed; about 10 to 12 minutes. You may hear a dry, hissing sound, but don’t let the rice scorch. If you must peek inside to check the rice's progress, do so quickly and immediately replace the lid.
Once the rice is cooked, remove the pot from the stove. Lift the lid, toss in the minced blossoms and recover the pot immediately. Do not stir the flowers in; rather, let them sit on top of the rice for now. Let the rice stand, self-steaming, for another 10 to 15 minutes (this ensures tender grains of cooked rice) but no more than 20 minutes, since it's best to shape the rice into bundles while still warm.
By rice cooker:
Place the washed and drained rice into the bowl of your rice cooker. Add the cold water and let the rice sit for five minutes to allow it to absorb some of the water before cooking. Press the switch to start cooking. Your appliance will automatically calculate the right length of time for cooking (about 45 minutes). When the cooking cycle has finished and your appliance switches to keep warm, it will signal you by beeping or playing a jingle. When it does, toss in the minced blossoms but don’t fold them into the rice yet. Recover the pot immediately and let it stand for another 10 to 15 minutes.
Shaping the rice
When you’re ready to shape the rice into bundles, use a shamoji or another flat, paddle-like spatula or spoon to gently fold the minced blossoms into the rice with light cutting, scooping and folding motions. Add the toasted sesame seeds and fold them into the rice, too.
Divvy up the rice into eight portions, each about half a cup. There are gadgets designed to help mold triangular bundles, or you can shape your omusubi by hand.
Using an omusubi mold:
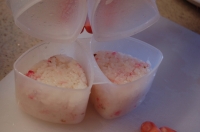
Molds typically have two pieces: a base into which the rice is placed and a lid that compresses the rice down. Submerge both pieces in the cherry-scented, salty water from dipping the blossoms and leaves — this will keep the rice from sticking to the mold.
Fill the base of your mold with rice, about half a cup for each omusubi. Place the lid on top and press until flush with the base. Remove the lid, invert and tap or press out the molded rice. Repeat to make eight triangular omusubi.
Using your hands:
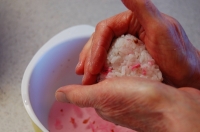
Dip your hands in the salted cherry water before picking up a single portion of rice (about half a cup) and placing it on the palm of your non-dominant hand. Using both hands, lightly compress the bundle. Keeping the rice on the palm of your non-dominant hand, cup your dominant hand with the thumb extended so that four fingers form a triangular “roof.” Rotating the bundle towards you, re-cup your fingers to form the other two points of the triangle. Repeat to make a total of eight omusubi.
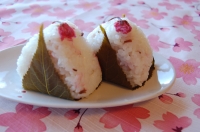
Arrange the brined leaves, shiny side down, on your work surface. Arrange one omusubi on each. Bring the sides of each leaf up to cover the base of the triangle, points facing up. Garnish the top of each omusubi with a whole blossom.





With your current subscription plan you can comment on stories. However, before writing your first comment, please create a display name in the Profile section of your subscriber account page.